Before Setting Up Outlook Express
You need to determine whether you will allow Outlook to delete messages from the Safe-mail server. If you will be accessing your email from more than one computer, we recommend that you leave the messages on the server. For more information on how to leave messages on the server using POP3, read the instructions here.
However, a better solution might be to use IMAP. For information on how to set up IMAP with Outlook Express, go here.
You will need to decide if you will be using POP3 SSL. POP3 SSL is secure and is strongly recommended - especially since there is rarely a need to disable SSL access to our POP3 servers. Furthermore, Safe-mail does not support sending messages without SSL enabled on your email program. This means that you will not be able to use regular POP3 to send messages.
If you do decide to go ahead and disable SSL access, you will need to go to Safe-mail.net, log on to your account, open Preferences -> POP, and set a password for non-SSL POP3 access. If you do not set a password for non-SSL POP3, then Safe-mail will not allow you to download messages.
Setting POP3 Access
This is for both SSL and non-SSL POP access. You will need to log on to Safe-mail.net and follow these directions:
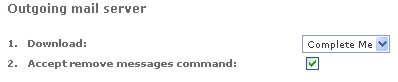
At the Download drop box, choose whether you wish to download the complete message, or just the message header.
By default, Outlook Express sends a 'remove message' command to the server for each message that has been downloaded. This means that all messages that have been downloaded to your computer will be deleted automatically from the Safe-mail server. If the checkbox is empty, the remove message command will not be accepted, and messages will not be deleted from the Safe-mail server. And, they will be downloaded again the next time that you download messages via Outlook Express.
For Non-SSL POP3 - Receiving Messages Only
Safe-mail does not allow you to send via POP without using Secure Socket Layer (SSL). This means that if your email program cannot use SSL to connect to our POP3 servers, you will need to log on to our web interface to send messages. However, you will still be able to receive messages.
To connect to Safe-mail POP3 servers without using SSL, you will need to set POP3 access (above) and specify a password (below). If you do not specify a password, you will not be able to download messages without POP3 SSL.

This password is for your security. We strongly recommend that you specify a password different than the one that you use when accessing your account via the Safe-mail web interface.
This section discusses how to setup Outlook Express for Safe-mail:
Standard Account Setup - You want to set up Outlook to send and receive messages using your Safe-mail account.
Combining Accounts - You have a non-Safe-mail email account, and you want to continue receiving messages from that account. But, you want to send messages using the Safe-mail outgoing servers.
Leaving Messages On the Safe-mail Server - You want to download messages using POP3, but you want the messages to remain on the server so that you can view them from another location.
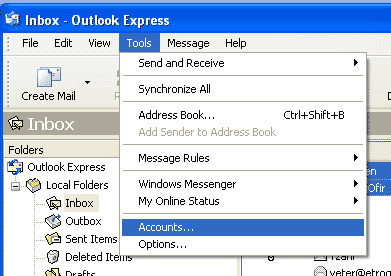
Select Tools and
then Accounts
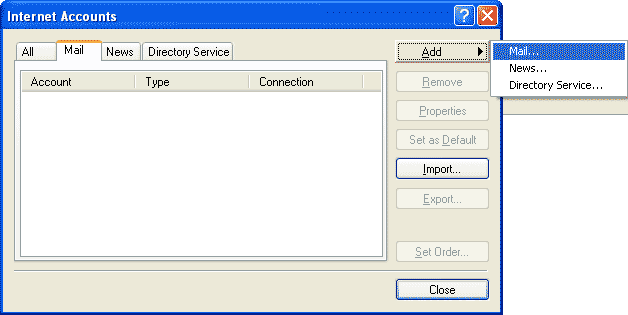
Select Add and then
click the Mail tab.
NOTE:
You are creating a NEW account, in addition to any other email accounts that
you may already have. This description is for new account setup from within
Outlook. You will need to use a different process to modify an existing
account.
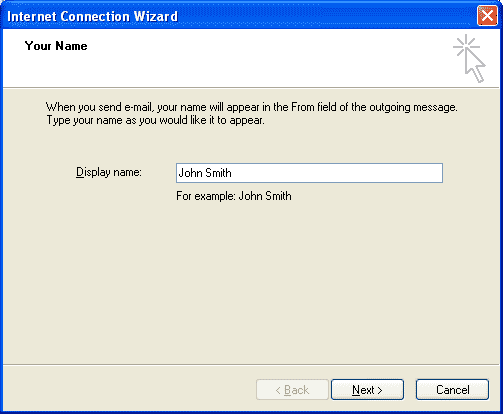
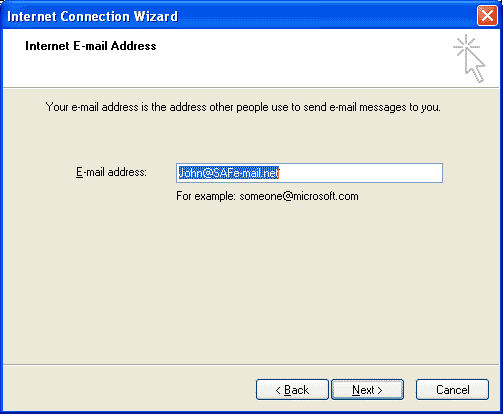
Type in a display name, click "Next"
Type in your Safe-mail e-mail address, click "Next"
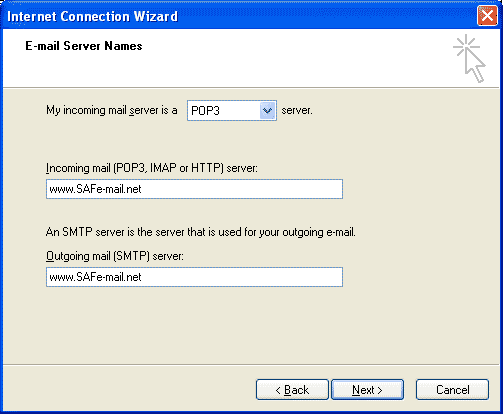
Select POP3 as the "Incoming mail server" type.
Type in the Safe-mail site's URL as the "Incoming/Outgoing mail servers", click "Next"
NOTE:
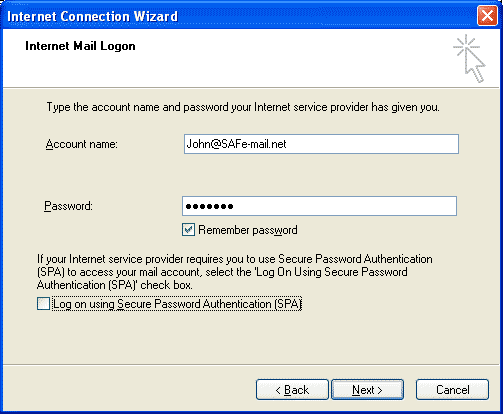
Type in your Safe-mail account
name (john@Safe-mail.net) and password, Leave the "Using Secured password ..." unchecked, click "Next"
NOTE: This is
totally safe, since the SSL protocol is used.
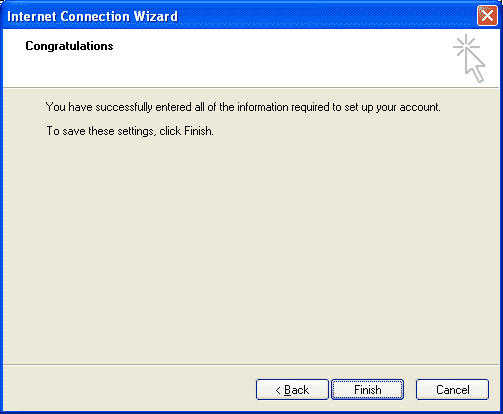
Click "Finish"
Select the account which you have just added, Click "Properties"

Select "Servers", Check on the "My server requiers authentication", Select "Advanced".
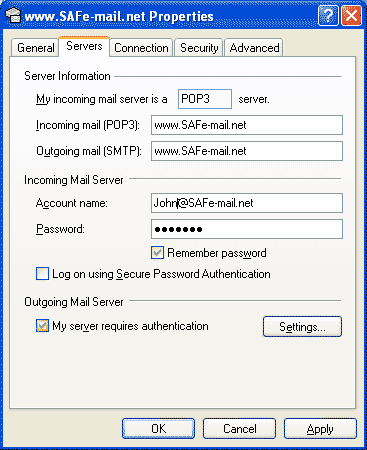
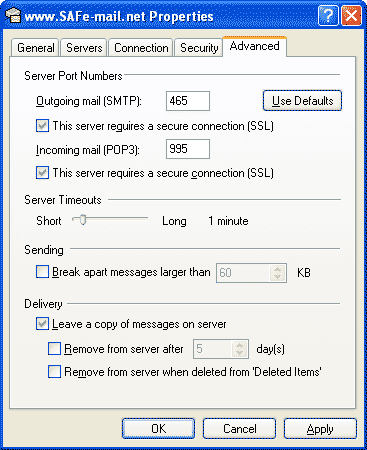
Type in 465 at the "Outgoing mail" port field, Check on the "This server requiers secure connection".
Type in 995 at the "Incoming mail" port field, Check on the "This server requiers secure connection".
Remove the check from "Leave a copy of messages on server" and click "OK" button.
NOTE:
If you will be accessing your messages from more than just this computer, we
recommend that you leave the check next to "Leave a copy of message on
server". However, a better option might be to use IMAP. For information
on how to set up IMAP on Outlook Express, go here.
Combining Accounts - Receive from one/Send via Safe-mail
There are times when you want to download messages from one POP account and send messages using a different one. For instance, there are some web space providers that provide Incoming mail servers, but do not provide reliable outgoing mail servers. There's nothing like not being able to know whether your email message was sent.
Here is a description of how to modify an existing account to download messages using one email account, but sending via your Safe-mail account. In the explanation below we will be setting up Billy Bobb's account. He has a website called www.mydomain.com. Unfortunately, the site doesn't have a reliable outgoing server. In response, Billy has decided to change his mydomain.com settings so that he receives the messages sent to his mydomain.com account, but sends his messages through his safe-mail.net account.
To modify an existing account...
In Outlook Express,
click the Tools in the menu bar and click Accounts. When the Internet
Accounts window opens, click the Mail tab.
It should look something like the window below.
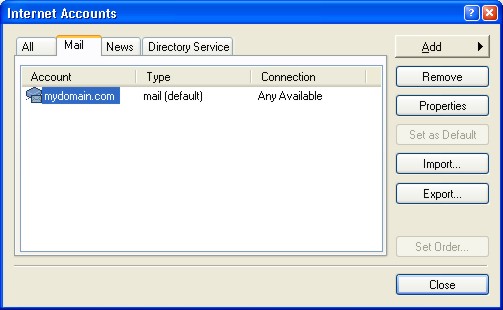
Select the Account
that you need to modify and click the Properties button to the right.
The Properties window will appear like the following:
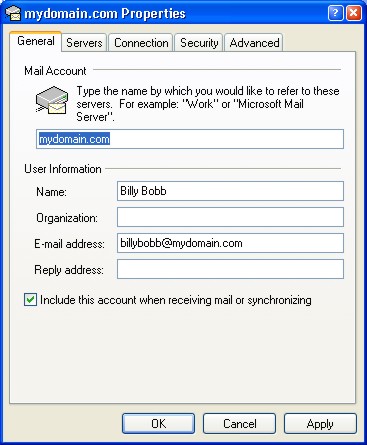
Click the Servers
Tab.
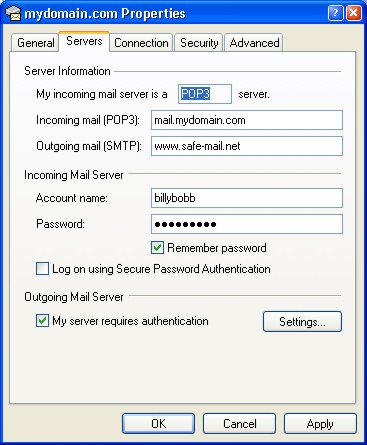
In the Outgoing mail (SMTP) change the value to: www.safe-mail.net. Towards
the bottom of the window, you will see the Outgoing Mail Server section.
Within that section, make sure that the checkbox for 'My server requires
authentication' has been checked.
NOTE:
In the Outgoing
Mail Server section, click the Settings button.
The Outgoing Mail Server window will appear (below)
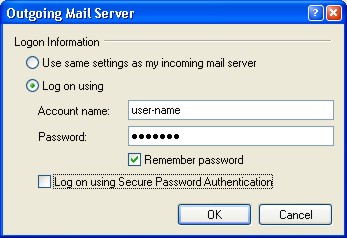
Just under 'Logon Information' you can see two radio buttons. Normally the
top button will be selected. You must select the second one, 'Log on using'.
You will then be able to change the other information in the window.
In Account name, type the name that you use when you log on to your
Safe-mail account.
In Password, type your Safe-mail password.
Make sure that 'Remember password' has been checked.
Click OK.
You will return to
the Servers tab. Click the Advanced tab.
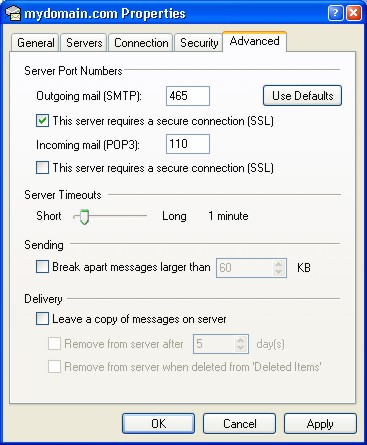
Leave the settings for 'Incoming mail (POP3)' alone. For 'Outgoing mail (SMTP)',
type 465 in the box.
Just below 'Outgoing mail' you will see a checkbox next to 'This server
requires a secure connection (SSL)'. Make sure that this checkbox has been
checked (as shown above).
Click OK.
You will return to the Internet Accounts window.
Billy Bobb can now receive his messages from his mydomain account, while sending with his Safe-mail account.
Leaving Messages On the Safe-mail Server
Normally, when you use POP3 to download messages from the server, your email program will ask Safe-mail to delete the messages when you have downloaded them from the server. If you wish to leave your messages on the Safe-mail server, the most efficient way to do this is described below.
NOTE: If you do not use this method, you will probably find that you will be downloading a new copy of old messages that remain on the server.
NOTE: You will need to log on to your account on Safe-mail.net to delete messages from your account. Otherwise, your messages will overflow your account.
This is for both SSL and non-SSL POP access.
Log on to Safe-mail.net
and click Preferences -> POP
Clear the check
from the checkbox next to 'Accept remove messages command'.
This will force Safe-mail to ignore delete commands sent by your email
program. However, you will need to make a change in your email program, or
it will keep downloading copies of messages that remain on the Safe-mail
server - clogging your folders with multiple copies of a message.
Now, open Outlook
Express, select Tools, and
then choose Accounts
When the Internet
Accounts window opens, select the Safe-mail account that you have
prepared.
Click "Properties" button to the right
When the account
properties box appears, click the Advanced tab.
Go to the section labeled Delivery, at the bottom of the window. Put a check in the checkbox next to 'Leave a copy of messages on server', and then click OK.